D.I.Y. Paper Cut Art Tutorial
On a rainy day, looking around at my bare white walls, I realised that the house needed some cheering up. I decided to take an opportunity to get creative and try my hand at paper cutting. Paper cut art is enjoying somewhat of a resurgence at the moment (like so many things). Delicate and precise, this craft is normally reserved for the incredibly patient, however simple designs can be attempted by even the most amateur of craftspeople (thats me).
Here are some tips before you start;
- You might want to do some practice cuts to get the feel of the knife/blade.
- Take it easy! Nice and slow. Cut in small sections. Cut curves as a series of short straight cuts. This helps to reduce the risk of cutting your finger off.
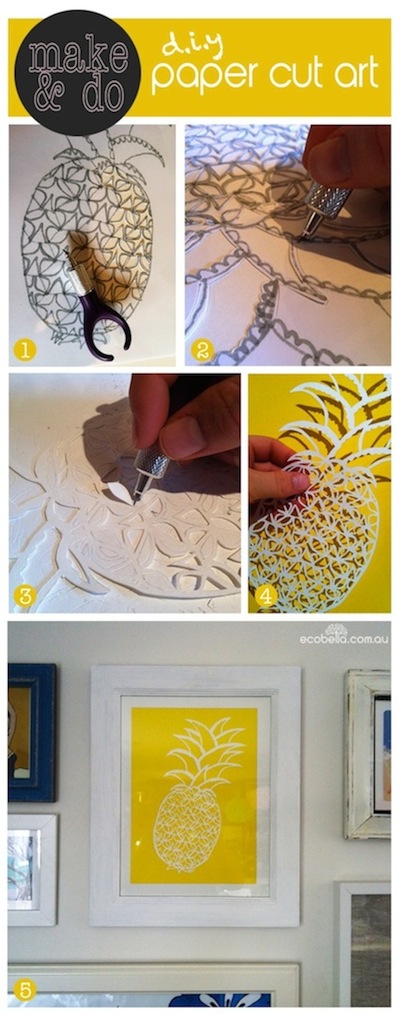
1) Sketch your design - and keep it simple. I drew a pineapple on an thin A4 paper sheet. Draw in thick lines - and remember the more detailed your drawing, the more complicated the paper cut will be! Then stick this sheet to your final paper cut sheet (I used an A4 sheet of thin water colour paper).
2) Cut - using a scalpel blade or specialty knife (I used a swivel knife from a craft store). Cut through both layers of paper, on either side of the thick lines of your design.
3) Inspect your handiwork - by removing your design sheet carefully, and assessing the final paper cut sheet. You may need to neaten some cuts, or re-cut any that may have been too shallow to cut all the way through.
4) Mount - your paper cut on a contrasting backing to make your paper cut pop! Play with the composition and use double sided tape to stick it down. I stuck my pineapple to an old A4 paint sample sheet in bright yellow. Love yellow!
5) Frame. Hang. Voilà!
Have fun!
Elena xxx


Comments
Post a Comment
what do you think?